Overview
NOTE: This page will only be displayed if your sponsoring buying organisation is able to receive electronic Invoices from the Supplier Portal.
The Invoice page enables you to configure settings for Invoices which will be created using the Supplier Portal.
These settings are used to determine information such as document numbering, payment due dates, settlement discounts, etc.
The Invoice page looks like this:
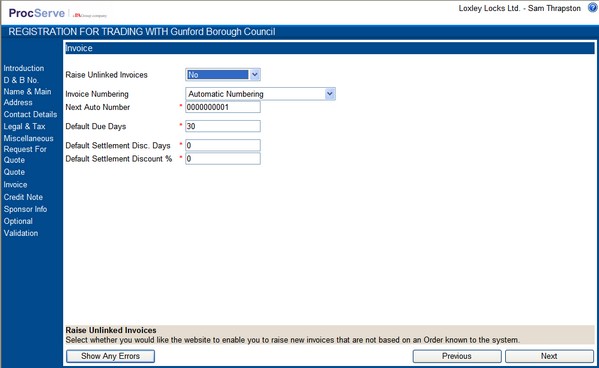
Data Entry
![]() This field is a drop-down list providing two options: "Yes" and "No". It is used to indicate whether Unlinked Invoices should be allowed to be raised and sent to the buying organisation.
This field is a drop-down list providing two options: "Yes" and "No". It is used to indicate whether Unlinked Invoices should be allowed to be raised and sent to the buying organisation.
The usual process is for the buying organisation to send an Order to your account within the Supplier Portal. This Order is then used as a basis for the creation of one or more Invoices.
The Supplier Portal does, however, provide the capability for you to create a Invoice that is not based on a received Order - this is called an Unlinked Invoice.
NOTE: it is recommended that you check with your sponsoring buying organisation if they will accept unlinked Invoices before applying this configuration setting. If unlinked Invoices are accepted, the value of "Yes" should be set within this data field.
![]() This field is a drop-down list providing two options: "Automatic Numbering" and "Manual Entry". It is used to indicate whether Invoices created within the Supplier Portal should be numbered automatically.
This field is a drop-down list providing two options: "Automatic Numbering" and "Manual Entry". It is used to indicate whether Invoices created within the Supplier Portal should be numbered automatically.
If "Automatic Numbering" is selected, all Invoices created within the Supplier Portal will automatically be assigned an Invoice number which increments by 1 each time.
If "Manual Entry" is selected, all Invoices created within the Supplier Portal will require the user to manually enter an Invoice number.
NOTE: Those suppliers that are integrating the Supplier Portal with their existing Invoice generation software, or are using the Supplier Portal to create duplicated versions of Invoices created within their existing Invoice generation software should select "Manual Entry".
![]() This field is used to specify the next number that should be applied to an Invoice if "Automatic Numbering" has been set in the previous field. Tip: If you use leading zeros, you may find it easier to navigate through lists of documents sequenced by number.
This field is used to specify the next number that should be applied to an Invoice if "Automatic Numbering" has been set in the previous field. Tip: If you use leading zeros, you may find it easier to navigate through lists of documents sequenced by number.
![]() This field is used to set a default value for the number of days (from the Invoice date) by which payment is required. This is a default value only and can be edited for particular Invoices created within the Supplier Portal.
This field is used to set a default value for the number of days (from the Invoice date) by which payment is required. This is a default value only and can be edited for particular Invoices created within the Supplier Portal.
![]() This field is used to set a default value for Invoice settlement discount i.e. number of days from the Invoice Date in which a discount may be taken if full payment is made.
This field is used to set a default value for Invoice settlement discount i.e. number of days from the Invoice Date in which a discount may be taken if full payment is made.
If settlement discounts are not offered to your buying organisation a value of 0 should be entered.
This is a default value only and can be edited for particular Invoices created within the Supplier Portal.
![]() This field is used to set a default value for the settlement discount i.e. the percentage discount which may be taken if full payment is made within the specified number of days when a new invoice is raised.
This field is used to set a default value for the settlement discount i.e. the percentage discount which may be taken if full payment is made within the specified number of days when a new invoice is raised.
If settlement discounts are not offered to your buying organisation a value of 0 can be entered.
This is a default value only and can be edited for particular Invoices created within the Supplier Portal.
NOTE: All data entry fields highlighted with a * are mandatory and cannot be left blank.
NOTE: As you enter data in field, additional help is displayed in the area at the bottom of the page e.g.
![]()
Use the Navigation Buttons to verify the data entered or to progress through the registration process.